www.fneunemann.com

grooves n'stuff (page 4)

Put the plane on the working surface and move it back and forth like you did during the first step flattening the sole, but always keep in touch with the fence. Again don't use excessive force pressing the plane down light pressure down to the center of the plane's footprint is just right.

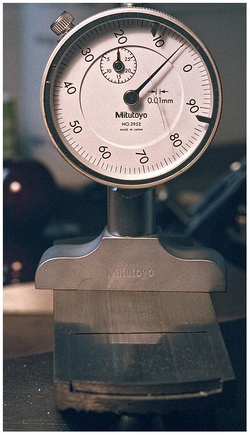
Checking the depth and flatness of the freshly cut groove across it's entire area

After 6 to 10 strokes remove the dust using the brush, turn the plane 180° and continue. Repeat this procedure until the strip stops cutting and replace it with a new one. Always keep the setup as clean as possible, to get the best possible precision. After you have used up the 2nd strip of sandpaper it is time to check the result using the depth gage and the beveled steel straightedge. You will realize that it takes some time to cut into the sole, but don't worry, there is no excessive patience required to put in the groove. The beveled steel straightedge shows the evenness of your work very quickly. If you apply light and even pressure to the center of the plane your groove should be of even depth and there are no "tricks" or fumbling about required to get it even.

This brings us to the question of the proper depth of the groove. The depth depends on personal preference and the kind of planing you intend to use the plane for. My personal preference is:

depth of groove = max. thickness of shaving + 2/100 mm

For a #9 1/2 block plane used for medium-fine work the thickness of a shaving is about 3/100 of a mm, so I put a groove of about 5/100 of a mm into the plane. Mic your own shavings and the and decide for yourself. I personally don't like the groove being too deep, because the plane starts to chatter more easily. According to the work I do, I prepared a couple of planes, with different depths of grooves, ranging from 8/100 to 3/100 of a mm.
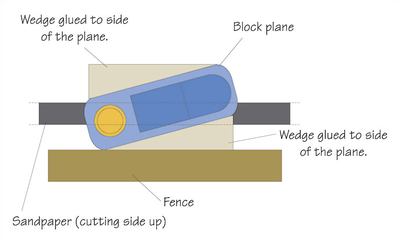
Possible setup for gringing a groove for a drawing cut. The second wedge allows turning the plane to avoid unevenness

At that year's meeting in Corbett Lake Lodge an attendant asked about how to prepare a plane like shown above to obtain a drawing cut, which you get when holding the plane at an angle greater than 0° (see above). My personal opinion is that there is no real need for a drawing cut, respectively holding the plane at an angle when planing bamboo, provided the plane iron really is razor sharp and the gap in front of the cutting edge is set properly.

Anyway, for those who prefer a drawing cut, there is a solution. Cut two identical wedge shaped pieces of wood using a table saw. Temporarily glue these two pieces to both sides of the plane according to figure 6 and continue with the procedures described above.

If everything has been done properly you should end up with a plane of very high precision. If you don't like it, it takes about 1 to 2 hours and a little elbow grease to completely remove the traces of your work again. The last thing to mention is to set the proper depth of the cutting edge. The setting is correct, when the plane iron cuts properly within the grooved section of the sole and does not cut left or right of the groove.

To top

Page 1 | 2 | 3 | 4

printed on  11.12.2024

Copyright by ©Frank Neunemann, 1996 - 2024